Many people assume they need an Adobe subscription to edit photos, even semi-professionally, but that’s not true. Photos for Mac is the answer for anyone who wonders, “Does Mac come with a photo editor?” Moreover, the good-old Preview you use to open PDFs and images has enough basic tools for editing an image on your Mac. In this guide, we’ll take a closer look at what you can do with Mac’s native photo editors and exactly how to do that.
Remove duplicate images first
As you start editing your pictures, it’s common to start accumulating duplicates of the same image—the original, an edited one, and perhaps any other version you might crop or resize later. But, an app like Gemini 2 will help you find and eliminate duplicate files wasting space on your Mac. Once you have Gemini 2 download and installed, just follow these simple steps:
- Open Gemini 2.
- Click + > Pictures Folder > Scan for Duplicates.
- Then, select either Review Results to manually choose the files you want to delete. Or let the Gemini app do all the hard work for you and click Smart Cleanup.

That’s it! That’s all you have to do. And I know it might seem too good to be true, but the Smart Cleanup button really will select the best version of each of your files and get rid of any other copies it finds on your Mac. But the best part? You can Download and try Gemini 2 for free!
How to edit pictures on Mac using the Photos app
As an editing app, Photos comes with everything you need to adjust the quality, light, color, sharpness, and other qualities of the pictures you take. It may lack the editing power of professional software like Photoshop, but it’s the perfect tool for aspiring and amateur photographers. It’s equally useful for the millions of us who take pictures every day and want to make them look good before posting online and sharing with friends. With this free photo editor for Mac, you’ll be able to adjust, resize, crop, rotate, and enhance your photos, as well as apply filters to them — all without spending a penny.
To edit a picture, go through the following steps:
- Launch the Photos app.
- Find the image or group of images you want to edit in your library.
- Double-click on the photo you want to edit (or press Command-Return).
- Click Edit in the toolbar. Now you’ll see three tabs above the image: Adjust, Filters, and Crop. Clicking on one will unveil further editing options in the right-hand menu.
- Another way to open a picture to edit is to press Command-Return to open in Edit view.
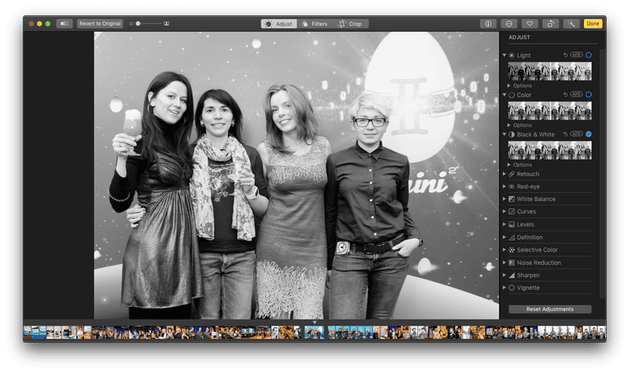

How to adjust pics in the Photos app
There’s a whole range of ways to use the Adjust feature to make significant or subtle changes to your pics. (And remember, if you aren’t happy with any of them, just click Revert to Original in the top left-hand corner of the editing window).
The Photos Adjust feature can be broken down into several specific tools.
- Light: everything from shadows to brightness to contrast.
- Color: make it warmer, colder, or adjust specific colors in a small area of a picture.
- Black & White: make the shot monochrome.
- Retouch: improve sharpness and other aspects of the picture.
- Red-eye: remove red eyes on a pic.
- White Balance, Curves, Noise Reduction, and many more.
Each of these settings can be adjusted with a series of sliders. Simply move one or more and watch the photo change. Click Done once you are happy with the edits you’ve made.
How to crop photos on Mac using Photos app
When you crop a picture, you can adjust the ratio or remove the parts you don’t want to improve its composition. With Photos, you can also flip it from horizontal to vertical, or the other way around.
Here is how you crop an image using Photos:
- Launch Photos.
- Find the photo you want to edit and double-click on it.
- Click Edit and go to Crop in the top toolbar of Photos.
- Click on Aspect on the right to choose an aspect ratio, or click Auto In the bottom right-hand corner of the screen to crop automatically.
- Click Done once you are happy with the picture.
Another way to crop or resize is to make these changes manually. Go through steps 1 - 3 above, then select Aspect. Now you can adjust the aspect ratio according to a series of pre-set parameters.
Once you’re satisfied with the result, click Done, or revert to the original if you want to start over.

How to apply filters in Photos app
In Photos, you have a series of nine filters designed to copy classic photography styles. Filters have been a part of taking photos — professionally and for fun — for generations before Instagram and Snapchat, so Apple made it easy to apply these with a few clicks.
Here’s how you apply a filter in the Photos app:
- Launch Photos.
- Find the photo you want to edit and double-click on it.
- Click Edit and go to Filters in the top toolbar.
- Choose from the Vivid, Dramatic, and Black & White options.
- Once you’re happy with the changes, click Done, or revert to try again.
How to edit photos with Mac’s Preview
Another way to make changes to photos using a native Mac tool is to use Preview. Although most people use it to view and make some changes to PDFs, it can also help make quick changes to images. It isn’t as feature-rich as Photos, but if you need a quick adjustment before sending or publishing a photo, it can get the job done. Let’s start with the basics: resizing an image.
How to resize an image with Mac’s Preview
Resizing an image doesn’t have to be a guessing game. Do the following to make a proportional resize and avoid the image looking squished or too stretched:
- Open the photo with Preview.
- Go to Tools in the Apple menu.
- Click Adjust Size.
- This will open a window where you can adjust the size of the pic either in pixels or in inches/centimeters.
- Make sure you keep the Scale proportionally box checked. That way, the image will preserve its original aspect ratio.
- Click OK when you’re done.
To rotate a photo, there is a rotate button on the top toolbar of the app (it looks like a square with an arrow). Click once or more, depending on how many times an image needs rotating to get in the right position. From the Apple menu, click File > Save once you’re done.

If you want to undo any changes, click Edit, then select Undo. You can also revert to the original to start again before making further edits. To do that, go to File > Revert to > Last Opened.
Now, if you want to crop an image, that’s also easily done with Preview, although the app lacks the more robust options available in Photos.
- Click and drag your cursor on the area of the picture you want to crop
- Click the Crop button in the top right-hand corner
- Now click File > Save to save this image, or revert or undo to start again
And finally, you can also adjust the color using Preview. Here’s how:
- Click Tools in the Apple menu
- Go to Adjust Color
- A range of sliders will appear, giving you the tools to adjust any of the following: exposure, contrast, highlights, shadows, saturation, temperature, tint, sepia, and sharpness. Although not quite as many options as Photos offers, this is a decent selection of edits that you can make quickly and easily without any third-party apps.


Edit photos with third-party Mac photo editors
Of course, if you’re looking to do more advanced edits to your photos, there is no shortage of third-party apps for you to use. Apps like Lightroom that allow you to make lighting adjustments and do some minor cleanup to your photographs. Or Photoshop that will allow you to change the composition and create entirely new images. While apps like this aren’t necessarily cheap or easy-to-use, they are powerhouses for editing photos on your Mac.
But between Photos and Preview, every Mac user has two robust, easy-to-use native photo editors to edit pictures to perfection before posting them online, sharing with friends and family, or sending to a client. You don’t have to spend weeks mastering Photoshop or other heavyweight photo editors — any change you need is a few clicks away.

