Apple Mail is an excellent email client. It is not only quick and mostly works without a hitch, but it also offers all the features you would expect from a modern email app, including support for accounts from multiple providers. Occasionally, however, you may run into glitches. One of those is search not working in Apple Mail, especially after upgrading your Mac to a new macOS version. In this article, we’ll show you how to fix it.
Why is macOS Mail search not working?
There are a number of possible reasons why Mail search is not working on Mac. For example, the search feature in Mail uses Spotlight, the Mac’s system-wide search tool. If there’s a problem with Spotlight, like a corrupt database or a problem with indexing, search in Mail may not work. Other reasons include:
- Spotlight settings configured incorrectly
- macOS not updated
- Corrupt Mail database
- Third-party software interfering with Mail
- Problems with your internet connection
- Lack of free storage space on your Mac

How to fix it when Mac Mail search is not working
1. Restart Mail
Quit Mail and then reopen it. This will delete temporary files and clear caches, and it may be all you need to do to fix the problem.

2. Restart your Mac
If restarting Mail doesn’t work, try restarting your Mac. This will clear out RAM, delete temporary files across the system, and, on Mac with Apple silicon, perform checks on the startup disk.

3. Reset Mail
Resetting an app means putting it back in the state it was in when it was first installed. To do that, you need to remove all the settings and preferences files it has placed on your Mac. If you were to do that manually, you would have to track down all the files and drag them to the Trash. That can be a lengthy and tedious process. Fortunately, you don’t have to do it manually. CleanMyMac’s Applications tool can do it for you.

As well as uninstalling apps completely, it can remove files left over by other apps that weren’t uninstalled correctly and, importantly in this context, reset misbehaving apps by tracking down and removing those files. Get your free CleanMyMac trial and follow the steps below to reset Mail:
- Open CleanMyMac and choose Applications in the sidebar.
- Run a scan and click Manage My Applications > Uninstaller.
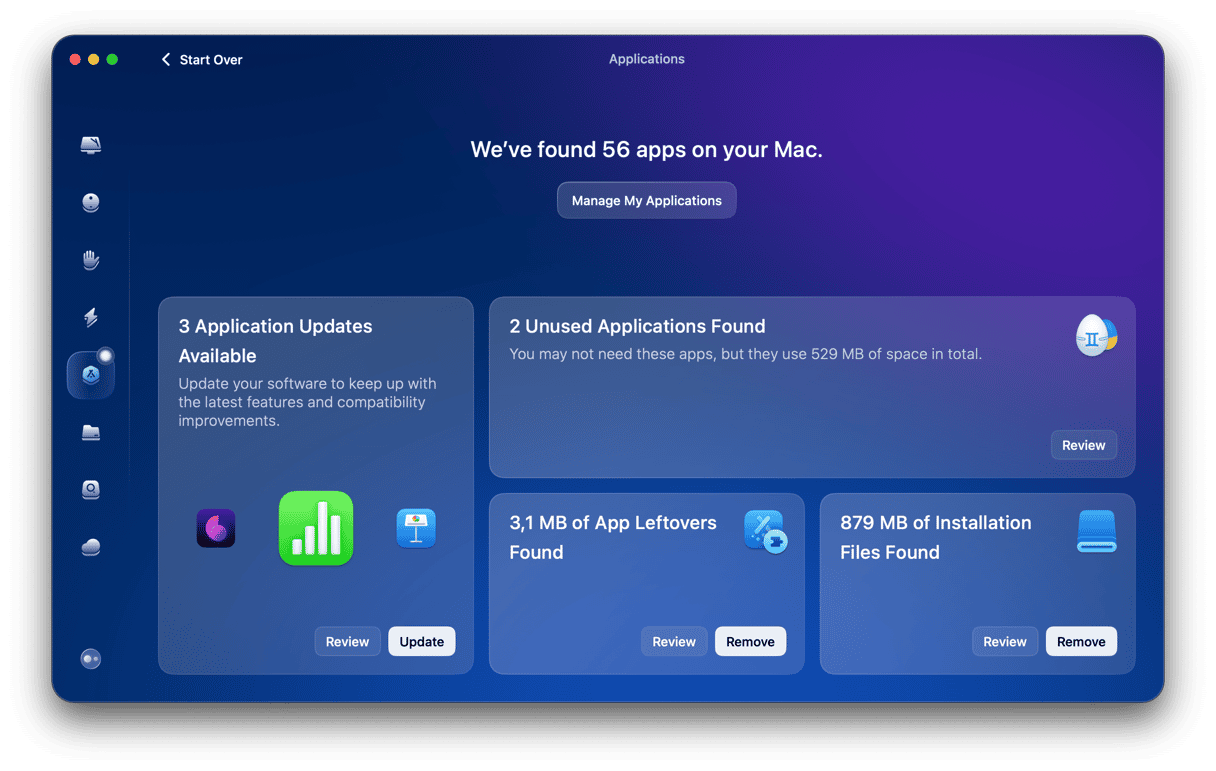
- Select Apple under Vendors and look for Mail from the list of all apps.
- Click the arrow (>) next to Mail and select everything except Binaries.
- Click the Remove button.


4. Rebuild your inbox
In Mail, select the unified inbox in the sidebar. Then, click the Mailbox menu and choose Rebuild. This recreates the index of mail messages and can sometimes fix problems with searching.

5. Check for macOS updates
The search problem may be a bug in the version of Mail you’re running, and it may have been fixed in a subsequent update. The solution is to update macOS, which, in turn, will update Mail.
- Open System Settings.
- Click General > Software Update.
- Wait for your Mac to check for an update.
- If there is one available, follow the instructions on the screen to install it.

6. Rebuild Spotlight
If rebuilding the Mail database doesn’t work, the next step is to rebuild Spotlight’s index.
Here’s how to do that:
- Click the Apple menu and choose System Settings.
- Go to Spotlight, scroll to the bottom of the window, and click Search Privacy.
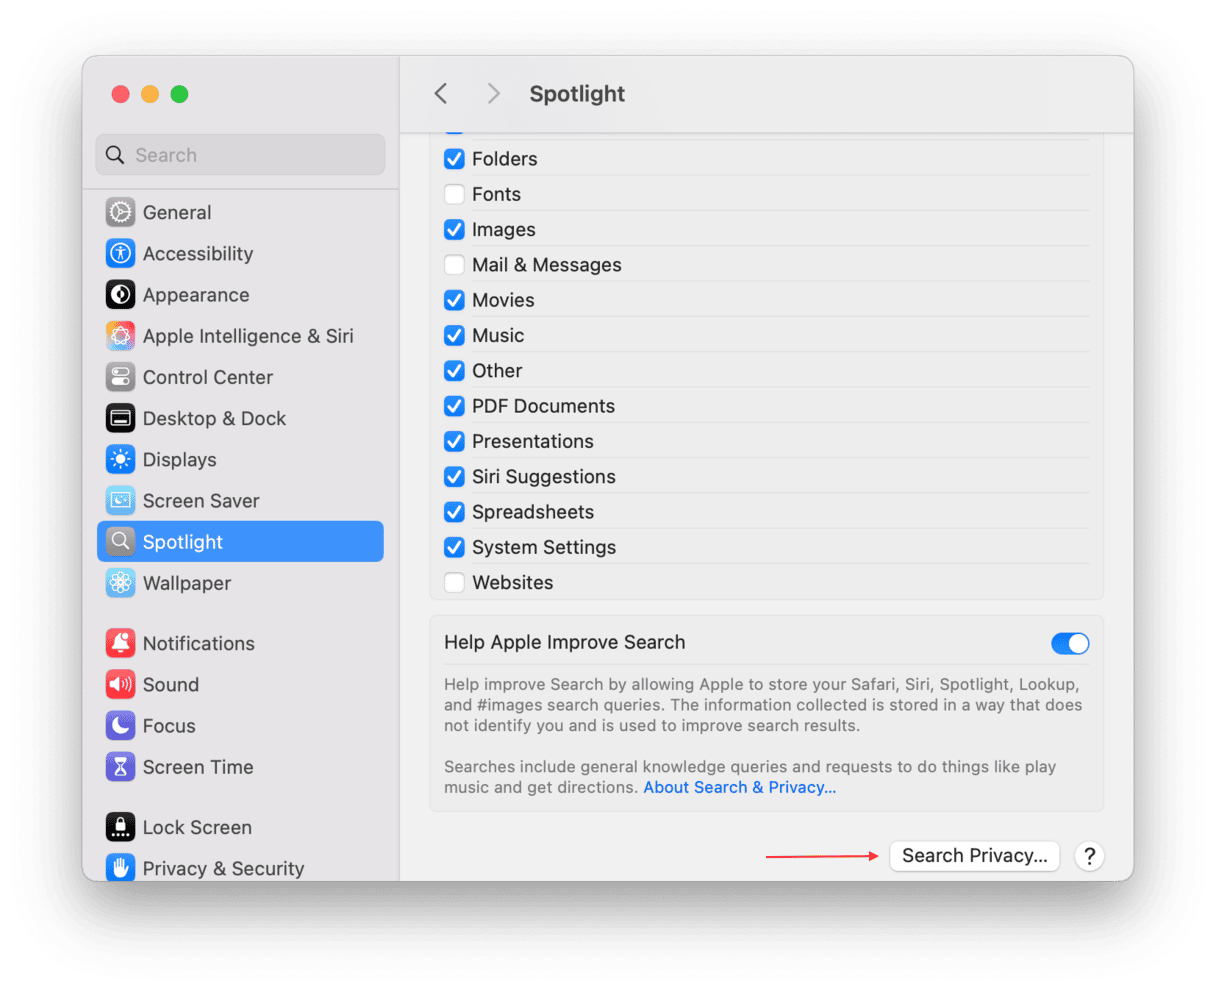
- Drag your Mac’s startup disk (usually called Macintosh HD) into the window, or click the ‘+’ and select it. Then, click Choose and Done. Quit System Settings.
- Wait for a few seconds and reopen System Settings. Go to Spotlight > Search Privacy.
- Click your Mac’s startup disk in the window, then click ‘-’ to remove it.

- Quit System Settings. Spotlight should start reindexing.


7. Check free storage
In System Settings, choose General > Storage. Wait for it to update, and then check how much free space is available. If it’s only a few gigabytes, you will need to free up space. Start by following the recommendations in that window.

8. Restart your Mac in safe mode
Safe mode loads only those extensions needed to boot your Mac and carry out basic tasks. If you restart in safe mode and Mail search works, you know the problem is being caused by an extension, probably a third-party login item or launch agent. You can then go to System Settings > General > Login Items & Extensions, turn off all the login items and extensions there, and reboot. Then, turn them on again one by one and test Mail search until you find the one causing the problem.

The way you restart in safe mode is different for Intel-based and Apple Silicon Macs. Here’s how to restart your Mac in safe mode.
Intel-based Mac
- Restart your Mac and press and hold the Shift key.
- Release the Shift key when you see the login window.
- Log in.
- Log in again if you’re asked to.
- You should see ‘Safe Boot’ in the menu bar.

Apple Silicon Mac
- Shut down your Mac.
- Press and hold the power button until you see ‘Loading startup options’.
- Select your startup volume.
- Press and hold the Shift key and click ‘Continue in Safe Mode’.
- Your Mac will now restart, and you will see ‘Safe Boot’ in the menu bar.

If you use Apple Mail, you’ll know what a good and capable email client it is, especially when it comes to privacy. That makes it all the more frustrating when it doesn’t work properly, especially if the fault is something as important as search. So, just follow the steps above to fix Apple Mail not searching and get it working properly again.


