Did you know that you should continually monitor Mac drive space to make sure there’s always room for your next big download and to keep your computer running smoothly? But how to find storage on your Mac and what to delete? Keep on reading to learn this and more.
6 ways to check storage on MacBook
1. Check MacBook storage via About This Mac
The simplest way to check Mac hard drive space is by accessing About This Mac. Depending on the macOS version you’re running, you will need to follow different steps.
macOS Ventura or later
- Click the Apple logo in the menu bar and choose About This Mac.
- In the About tab, click More Info > Storage Settings.

The colored bar chart in the window that opens will show you how much storage space is being taken up by System Data (caches, logs, temp files, etc.), Documents, Apps, and more. It will also display available space on your startup disk and its total capacity as well as allow you to manage different file types.
You can hover over bar sections or check the categories below for more information on what is eating up space. Colors are used for visual representation of the categories, and they may differ in different macOS versions. Note, though, that the colored graph is generally unreliable for detailed storage management, but it is pretty accurate for a top-level overview of space hoggers.
You can also access it from System Settings > General > Storage.
macOS Monterey or older
If you’re running an older macOS version, you do not need to click More Info to find the Storage option once you click About This Mac. You will have the Storage tab in the window that opens.

2. Use a Mac cleaner app
Usually, junk files, along with large and old files, are the biggest space wasters on our Macs. Over time, they end up cluttering your storage. So, the best way to free up some space is to dig up this clutter and old massive files. And CleanMyMac can help you out with that task.
First, let’s find junk files: unneeded language files, user cache, broken login items, unused disk images, and other clutter. CleanMyMac comes with the Cleanup feature that hunts down all of these files and even more. Here’s how to use it:
- Get your free CleanMyMac trial.
- Install and open the app.
- Go to Cleanup and click Scan.
- Review what to get rid of or click Clean right away. Worry not; only files that can be safely removed will be deleted.

Now, let’s continue decluttering your storage. With a dedicated My Clutter module, you can quickly clean up your Mac.
- Open CleanMyMac again and go to My Clutter.
- Run a quick scan.
- Click Review All Files and explore the categories such as Large & Old Files, Duplicates, and others.
- Select the files you want to delete and click Remove.

The benefits of using CleanMyMac
- Comes with 25+ tools to declutter, protect, and optimize your Mac — you can test them all during a 7-day free trial
- Over 29 million downloads in 180+ countries (Trustpilot rating: 4.7/5)
- On average, users find and remove 10 GB of junk after the first scan, and the scan-clean process takes up less than 15 seconds
Try CleanMyMac for free — see how much junk you can remove with just 2 clicks.
3. Сheck Mac storage via Disk Utility
Another option available for Mac users is checking storage via Disk Utility. It is a built-in app that helps manage both internal and external storage devices, format and reformat them, and solve some issues that may emerge with hard drives.
Here’s how to use it to check Mac storage:
- Open the Finder and go to Applications.
- Navigate to Utilities > Disk Utility. Alternatively, you can open it via Launchpad or ask Siri to do that for you.
- Click Macintosh HD from the sidebar, and you will see how much storage is used and how much of it is still free.

Note, though, that this overview is general. Meaning that if you want a more detailed insight into what is taking up space on your Mac, it is better to access storage information via About This Mac.
4. Сheck Mac storage via the Finder
You can also use the Finder app to find out how much available storage your Mac still has. The Finder is an app that organizes all your data, such as applications, media, documents, folders, and any other files. It can also help get information about hard drives, and it is what we need in this case.

Here’s how to check Mac storage via the Finder:
- Click the Finder icon from the Dock.
- Under Locations from the sidebar, click Macintosh HD.
- Now, press Command + I.
- In the Info window that opens, click General to see capacity, available, and used storage.
Alternatively, you can control-click or right-click Macintosh HD and navigate to Get Info.

Like with the Disk Utility, this method provides a general overview of Mac storage.
Here are a few more things you can do in the Finder:
- Calculate folder sizes: with the list view enabled, press Command + J and select the checkbox next to Calculate all sizes (you will have to repeat it for all locations for which you want to have the option enabled).
- Show hidden files: in any folder, press Command + Shift + Period to reveal all hidden files and folders on MacBook. If you want to hide these files and folders again, use this shortcut, too.
- Archive files: send any files you rarely open to a separate folder, right-click it, and choose Compress. Compression reduces file size by identifying repeated data patterns, thus helping you quickly reclaim some space.
5. Use Quick Look on the Desktop
Another way to check storage on Mac is to use Quick Look on the Desktop. First, you’ll need to change some Finder settings:
- Open the Finder and go to its settings from the menu bar.
- In the General tab, select Hard disks.
- Quit Finder settings.

Now, find your drive’s icon on the Desktop. Click it and press space bar — you’ll see total and available space without a detailed breakdown.

If it doesn’t work for you, you can always disable the Hard disks feature in Finder settings.
6. Run a Terminal command
Finally, you can run a Terminal command to check storage on Mac. Note, though, that if you’re not comfortable with using this command-line tool, it’s better to choose one of the other 5 methods described above.
- Go to Applications > Utilities and open Terminal.
- Paste the following command and press Return:
df -h - You’ll see different volumes — /System/Volumes/Data is the one you need to look at.

Important: The numbers in Terminal are provided in gibibytes (GiB). If you want to convert them to gigabytes (GB), you will have to multiply a specific number by 1.073741824. For instance, 460 Gi (in the screenshot above) equals around 494 GB — it is the total storage my Mac has.
How to manage storage on Mac
1. Use built-in Optimize Storage feature
Did you know that macOS comes with a built-in feature designed to help you manage storage? To access it, go to System Settings > General > Storage and check Recommendations under the colored graph. See what each option does and enable what works best for you.

For pre-Ventura macOS versions (Monterey and older), it is found here: Apple menu > About This Mac > Storage > Manage.
2. Reduce clutter
After enabling the optimize command, take some time to get rid of clutter. Here are a few things to consider:
- Delete unused applications.
- Send large files to the trash if you no longer need them. You can use the Finder and its search tools to locate such files (check the FAQ below). Also, remove unneeded downloads and installers (.dmg and .pkg files).
- Remove system and application caches. Always double-check which system files you delete. To learn how to safely clear cache on Mac, check out this article.
- Get rid of unnecessary backups. If automated backups are enabled, you can delete some by opening Time Machine and checking what can be removed there. You’ll need to select a backup for removal, click the gear, and choose Delete Backup. Make sure to delete only the oldest ones.
- Set Trash to empty automatically every 30 days (check Recommendations under the colored bar in System Settings > General > Storage).
You can delete some of this clutter by checking the categories of files under the colored graph in the Storage tab of System Settings. Just click the i next to each category and choose what to delete.

Another way to manage storage on Mac is to use a dedicated Mac cleaner app. If you’re not sure which one to choose, here’s an article on best cleaner software.
3. Move some files from your Mac
If you don’t want to delete files but still need to free up space, moving them to external drives or cloud platforms like iCloud, Dropbox, or Google Drive is a good start. All you have to do is select files and then drag them to your preferred destination.
To take it a step further, try the Cloud Cleanup tool in CleanMyMac. It connects to your cloud accounts and gives you a clear, tile-based view of your stored files. You’ll instantly see which files are synced locally and which are only in the cloud, helping you make smarter storage decisions. Here’s how to do it step-by-step:
- Start your free CleanMyMac trial.
- Click Cloud Cleanup from the sidebar and connect the cloud storage account you want to check.
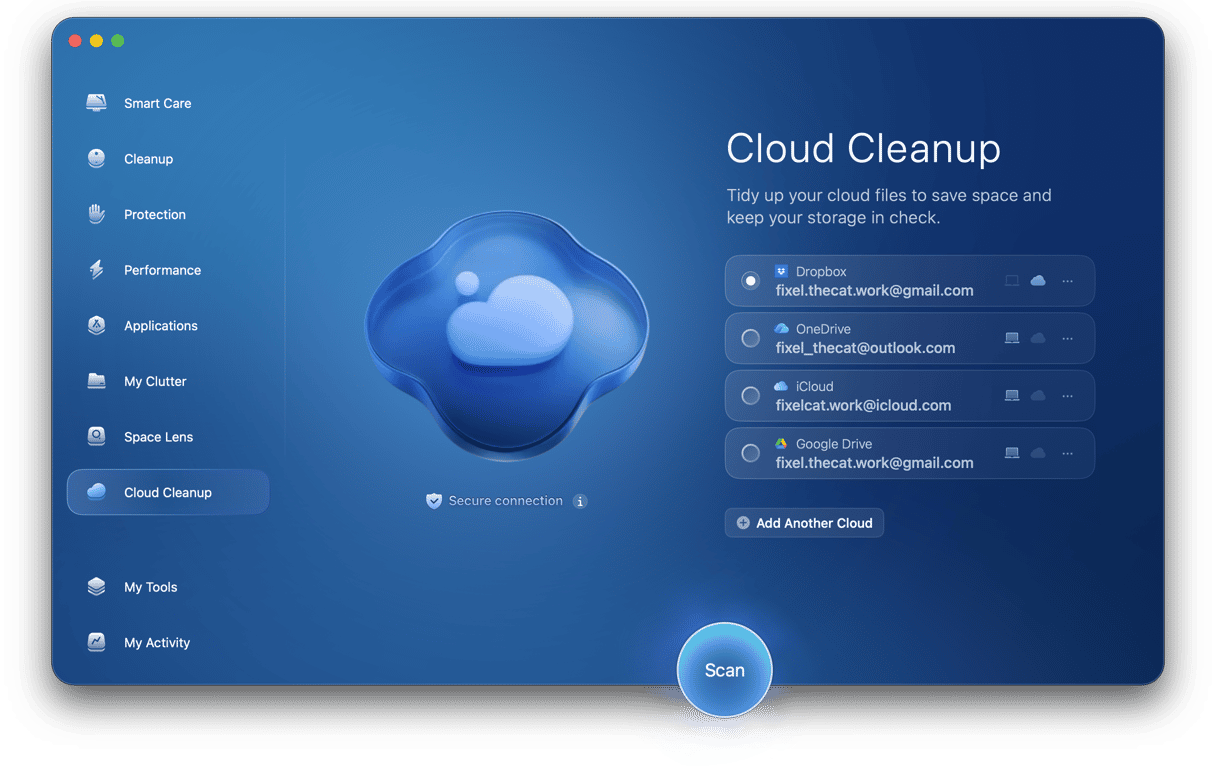
- Once the account is synced, click Scan.
- Review the files stored both locally and in the cloud.
- Unsync or remove unneeded files in just a few minutes, freeing up valuable space.


There you have it. You now know how to see how much storage on Mac is available and what to do to free it up quickly. Remember to keep your Mac up-to-date and declutter it from time to time — say, once a month — to keep it running smoothly.
Frequently Asked Questions
What is taking up so much space on my Mac?
To find out what’s taking storage on your Mac, you can go to the Apple menu > About This Mac to get a detailed breakdown or use the Finder or Disk Utility for a general overview.
Is it safe to use third-party Mac cleaning apps?
Yes, as long as the app comes from a trusted developer and you download it from the official website. Among all cleaner apps available on the market, CleanMyMac is a top choice — not only can it help you declutter your Mac and quickly get rid of safe-to-delete junk files, but it also has tools to bulk uninstall apps, scan your MacBook for malware, and run maintenance tasks.
How to find large files on Mac?
In the Finder, press Command + F, select Kind filter, and choose File Size. Then select “is greater than” criteria in the second box and enter the size (for example, 400 MB) — the search results will update, showing you the large files on your Mac.
How much space should the system take up on Mac?
Mac’s system takes about 20 GB on average. If your Mac’s system is considerably bigger than 20-25 GB, check out this handy guide to learn how to clear System Data storage.
Why is my Mac running out of storage space?
For the most part, it is because of the buildup of apps and media files. However, if you have only a few applications and not a lot of photos, videos, or music, it may be due to the accumulation of junk files (app caches, logs, temp files, and other files included in the System Data category). For example, if you use AI apps, photo or video editors, games, messaging apps, and streaming applications, they generate a lot of cache files that quickly eat up storage space. Eventually, you will get a message telling you that your startup disk is almost full.
Why does my brand new Mac already seem full?
If you have transferred your data from your old MacBook without decluttering it first, it might be the main reason — all junk has been transferred, too. If you're new to Mac, it may have happened due to syncing issues, enabling local Time Machine snapshots, having a large unemptied Trash, and using apps generating a lot of cache files. These files are usually unaccounted and not so easy to delete because they are hidden under the System Data category.
Can I add more storage to my MacBook?
No, not in new Macs that come with drives soldered into the motherboard. The only way to add more storage is to buy more in the first place. However, Apple charges around $200 for extra 512 GB of storage. Still, if you buy a Mac for 5+ years, this investment is worth paying for. Nonetheless, if you own an older Mac (released in 2016 or earlier), you may replace an SSD and add more storage.