On Windows in the 2000s, you'd literally watch a little visualization of colored blocks rearranging themselves for an hour. That’s what defragging looked like back then. When SSDs replaced spinning drives, defragging became a thing of the past. Modern SSDs defrag themselves by automatically moving data to optimize performance.
While modern Macs may slow down for various reasons, defragging is not a solution. Next, we'll explain why defragging is obsolete and outline safer ways to speed up your Mac.
Can you defrag a Mac?
Technically, yes — but only on Macs with a traditional hard drive (HDD) running a macOS version older than High Sierra (2017). A Mac running any version of OS X later than 10.2 generally doesn’t need to be defragmented. This is because OS X and macOS have built-in Apple Mac utilities that clean up fragmented files on the drive. Therefore, for most users, it eliminates the need to manually defragment a Mac. More than that, the latest macOS versions do not support any third-party defragging software for Mac, except for the built-in utilities that run automatically.

How macOS handles fragmentation automatically
Since 2002, macOS has handled fragmentation on its own — quietly, in the background, with no input from you. Two mechanisms do the work:
- On-the-fly defragmentation. Whenever you open a file that's been split into more than 8 pieces and is smaller than 20 MB, macOS automatically reassembles it into a single block. This has been the default behavior since Mac OS X 10.2 Jaguar (2002).
- Hot File Adaptive Clustering (HFC). Introduced in Mac OS X 10.3 Panther (2003), HFC tracks files you read often but rarely change, then moves them to a faster region of the drive. The files get defragmented as part of the relocation.
Together, these features mean fragmentation on a Mac is a self-solving problem for the majority of files. You don't need a defrag tool, and you don't need to schedule maintenance — your Mac has been doing the job invisibly since the early 2000s.
What APFS changed
In 2017, Apple introduced APFS with macOS High Sierra. One of its key features is a “copy-on-write” approach: when you modify a file, APFS writes the change to a new location on the drive rather than modifying the original. This actually scatters file pieces around the disk over time, so strictly speaking, APFS doesn't prevent fragmentation. It can even cause more of it.
The reason this doesn't matter is the hardware. Every Mac since 2017 comes with an SSD, and SSDs have no moving parts. Unlike a spinning hard drive, which must physically seek across the disk to read scattered pieces of a file, an SSD can reach any location instantly. Whether a file is in one piece or a thousand pieces makes zero difference to how fast it loads. So, although your files are technically fragmented, you cannot feel it or fix it in any way that would matter.
Should you defrag your Mac?
For almost everyone, no. If you bought your Mac new in the last several years, it has an SSD, and defragging an SSD does nothing useful — fragmentation only slows down spinning hard drives, and your Mac doesn't have one.
But the final answer depends on your drive type. To find out what kind of drive you have, go to Apple menu > About This Mac > More Info > System Report > Storage. Here, check the Medium Type.

- If your Mac has an SSD (every Mac sold new in the last several years), fragmentation won’t affect its performance and may only speed up its degradation as it performs thousands of write operations each time.
- If your Mac has a Fusion Drive (some iMacs and Mac minis from 2012–2020), defragmentation is useless either way. macOS automatically manages how files move between the SSD and HDD halves, so manual fragmentation is unnecessary.
- If your Mac has a traditional hard drive, macOS handles fragmentation on their own and has done so since 2002. For almost all real-world uses, the built-in process is enough.
Although if your Mac feels slow, there may be other causes. The next section covers what to actually do.

How to optimize your Mac in other ways
If your Mac is running slowly, you don’t necessarily need to defrag Mac hard drive. Sometimes it’s not your HDD or SSD that’s having problems. Therefore, try some alternative methods that may help you speed up the system without disk defragging on Mac.
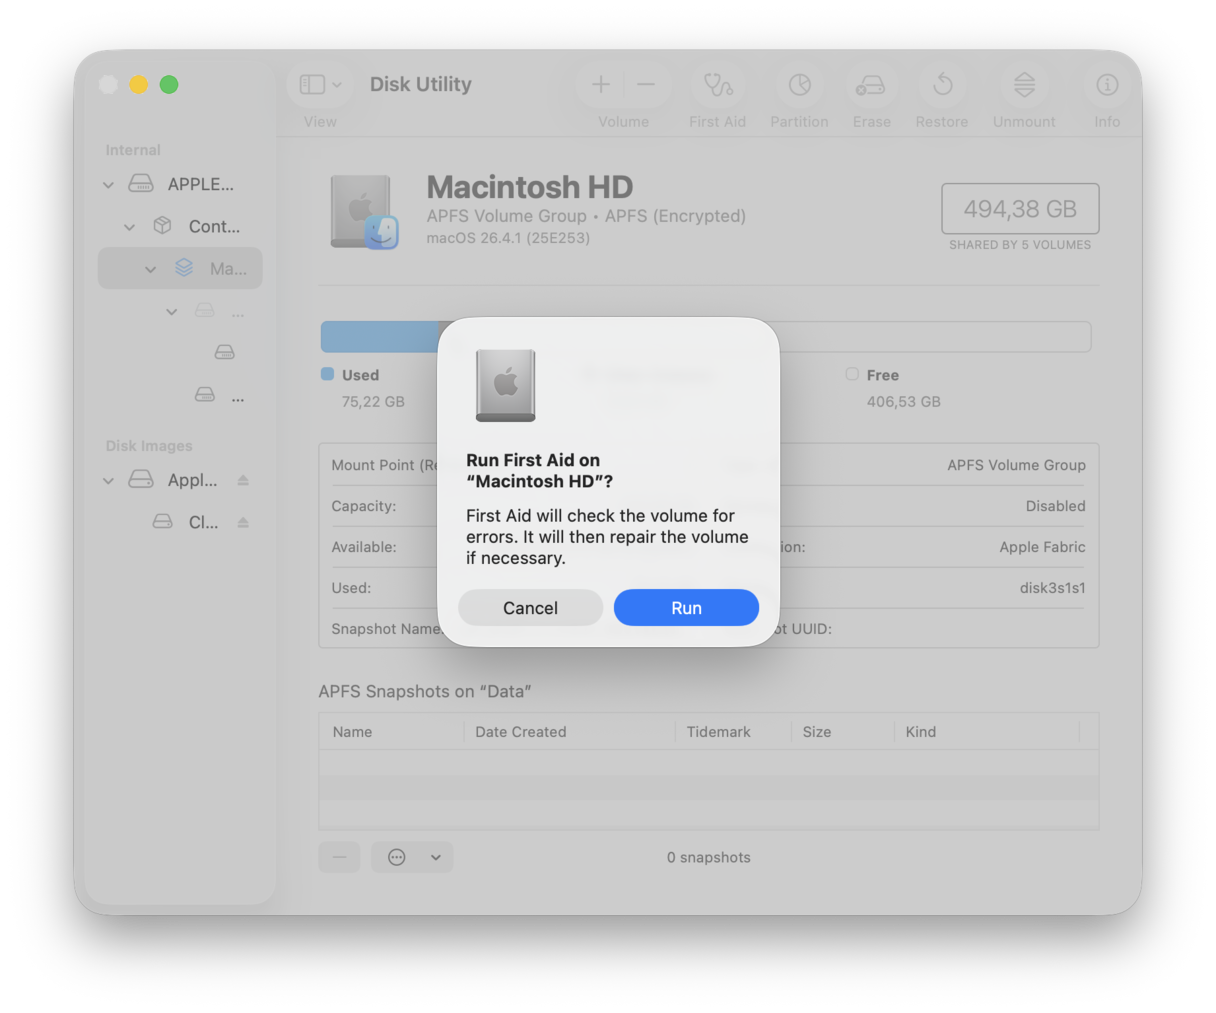
1. Run First Aid
Before you try anything else, run First Aid. First Aid is built into Disk Utility, the disk-management tool that comes with every Mac. When you run it, macOS checks the drive's file system for errors and automatically repairs the ones it can fix. First Aid is also a great tool to run if your Mac feels generally sluggish for no obvious reason.
How to run First Aid:
- Press Command + Space, type "Disk Utility", and hit Return.
- Click View > Show All Devices in the menu bar. This shows you every drive and every volume on it.
- Select your startup disk's container (usually called Macintosh HD) in the sidebar.
- Click the First Aid button at the top of the window.
- Click Run in the window that appears, then Continue.

2. Free up disk space
Having enough free space on your Mac is one of the most effective ways to keep it performing well. A good rule of thumb is to ensure that you have at least 10 percent of the overall storage available. It is even better to aim for 20 percent.
There are several tips you can follow to optimize Mac storage:
- Find and remove large and old files, such as photos, videos, and .DMG files.
- Get rid of apps you no longer use or need.
- Delete unnecessary files in the Downloads folder and empty the Trash.
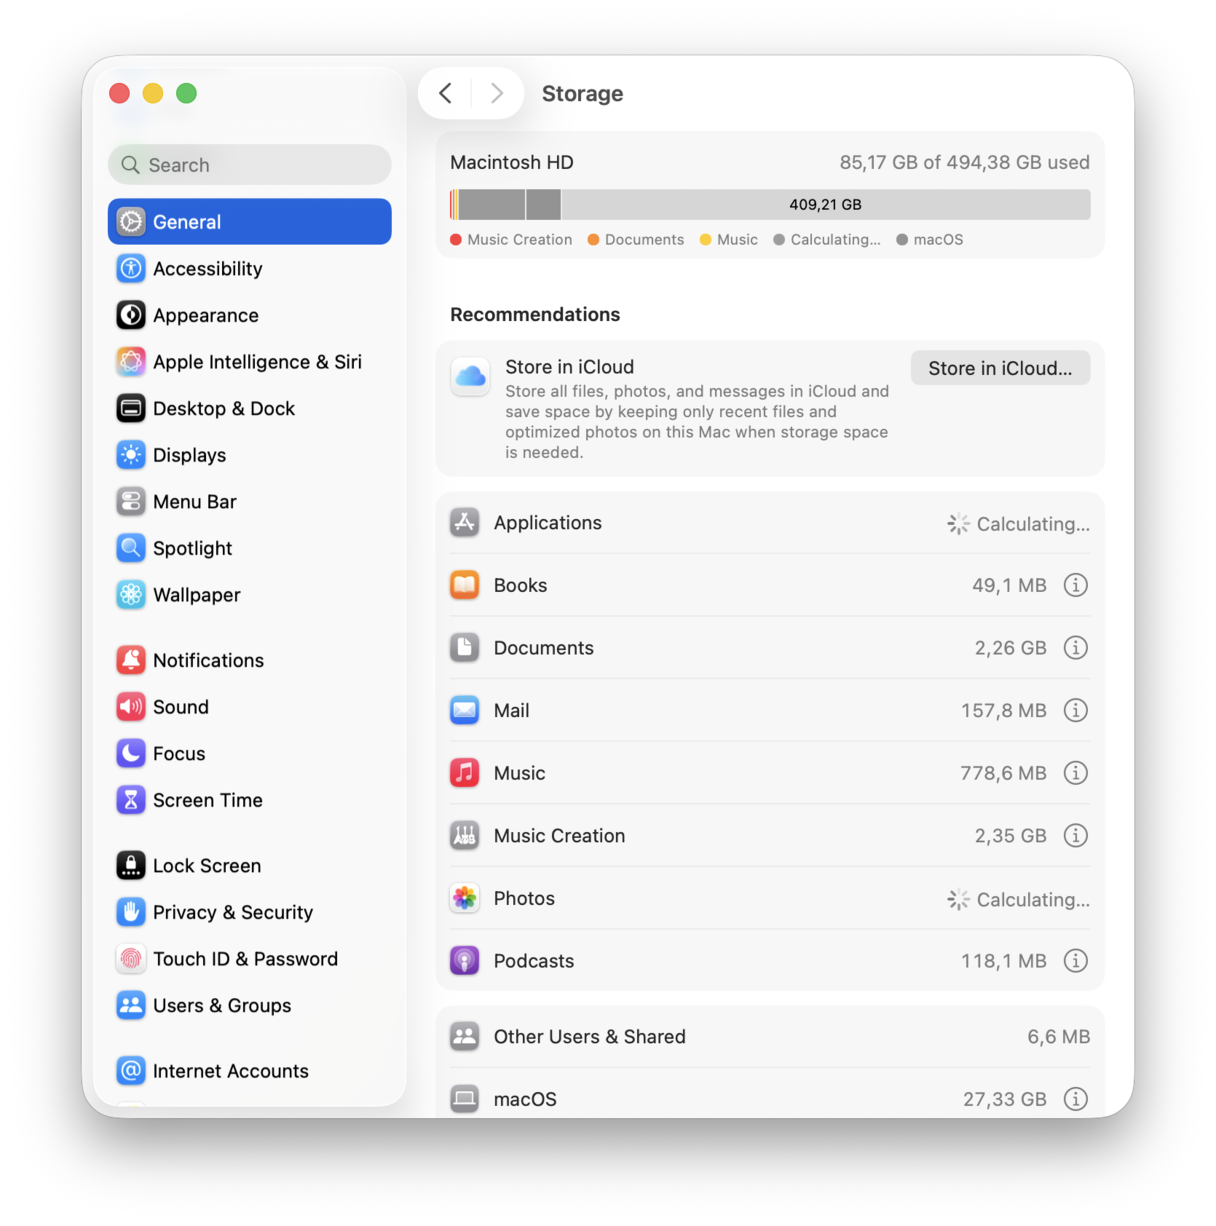
The process of manually hunting down all of these files is time-consuming. Luckily, there is a built-in tool that can help you out, and it is called Optimized Storage. Here’s how to use it:
- From the main Apple menu, go to System Settings.
- Click General > Storage.
- Under the colored bar, check Recommendations. You can also click the i icon next to the categories below and see what else can be safely removed from your Mac.

3. Clean up system junk
Once you've freed up obvious space, check for system junk — temporary files, user and system caches, old document versions, unused language files, log files, and so on. These accumulate quietly over months of use and can take up several gigabytes on a typical Mac. They're safe to delete, but tracking them down by hand is tedious: they're scattered across system folders, and some of them require Terminal commands to even find.
A maintenance app like CleanMyMac can handle this in one go, scanning the standard junk locations and showing you what's safe to remove before you delete anything. Here's how to use it to free up space:
- Start your free CleanMyMac trial and install the app.
- From the sidebar, go to Cleanup and click Scan.
- Once the scan is complete, you can review the details or click Clean to remove all the junk found right away.

Reasons to use CleanMyMac:
- Finds hidden files you can't easily locate yourself and clears 8 GB of system junk on average
- Uninstalls apps completely, including the leftover files dragging to the Trash leaves behind
- Clears clutter from your cloud storage, so you stop paying to store files you don't need
Try CleanMyMac for free — see it in action on your Mac.
4. Update macOS and your apps
Try to update your software to the latest versions, as it is usually optimized and performs better than the previous ones. System updates include performance and bug fixes that could be the reason for slowdowns.
To update macOS, go to System Settings > General > Software Update. If an update is available, just follow the on-screen instructions to install it. It is also a good idea to have automatic updates turned on.

When it comes to updating apps, there are several ways to do it:
- Go to the App Store and click Updates from the sidebar. Either update apps one by one or click Update All.
- If you downloaded an app from the developer’s website, visit it once again and install the latest software version.
- Open an app on your Mac and click on its name from the menu bar. Look for the Check for Updates option. Also, browse app settings to find out if automatic updates are available. If yes, turn it on.
5. Uninstall apps you don't use
As mentioned above, getting rid of apps you no longer need is an efficient way to free up some space on Mac. What is even more important is that if you do not use an app, you are less likely to keep it up to date, and obsolete apps pose severe security risks. Therefore, it is safer to delete anything you do not use.

To delete an app, go to the Applications folder and drag unneeded apps to the Trash. Next, hunt down leftover files and delete them. To find out how to do it, check this handy guide on the correct way to uninstall apps on Mac.
6. Free up memory
The final tip is to free up some memory. Sufficient memory allows you to easily run and use all the necessary apps without knowing what a slow Mac is. You can try to free it up manually by quitting processes in Activity Monitor, removing Login Items, having fewer tabs open in your browsers, or clearing cache files.
If you’re looking for some magic spell to help with that, try Mac maintenance software like CleanMyMac. It will free up memory effortlessly and in no time. Here’s how to use it:
- Go to the menu bar at the upper right corner of your screen and click on the CleanMyMac Menu icon. It appears in the menu bar when you start CleanMyMac for the first time.
- Locate the Memory icon and click Free Up.
- Once you’re done, you can click on the Memory icon to view the details or even quit apps consuming the most RAM.

We hope this article was helpful and you’ve found the answers about defragmenting MacBook you were looking for. Stay tuned for more Mac hacks and tips!