If you regularly work in programs like Adobe Premiere Pro, Final Cut Pro, and Adobe Photoshop, you've probably encountered Photoshop scratch disk errors. The most common error is Photoshop's refusal to open, along with the message stating either "Could not complete your request because the scratch disks are full" or "Could not initialize Photoshop because scratch disks are full."
If you've stumbled on this page because you've experienced the full scratch disk issue, you're in luck; we're going to show you how to resolve your scratch disk problem easily and, as a bonus, keep your computer clean and performing at its best. Keep on reading to find out the following:
- How to clear scratch disk on Mac?
- What are scratch disks in Photoshop?
- Why scratch disks are full?
- How to empty scratch disk without opening Photoshop?
How to clear scratch disk on Mac?
First, we'll explain how to clear Photoshop scratch disk and fix the scratch disk full issue on a Mac.
Immediate solutions
1. Clear your Photoshop cache
Photoshop has an in-built solution for deleting specific Photoshop caches. When these pesky caches aren't removed automatically by the program, they can grow and take up a lot of your disk space.
To use this tool, simply launch Photoshop on your Mac and follow these steps with an image open:
- Click the Edit menu button from the menu bar.
- Hover your mouse over "Purge" to reveal 4 different cache categories: Undo, Clipboard, Histories, and All. Here's what they mean:
- Photoshop records all commands you use while working on a project. Purging Undo sweeps away records about the most recently applied command.
- The Clipboard is a small part of memory that stores everything you copy. You can't insert copied data after you purge the Clipboard.
- Histories contain the previous versions of your project. Purging it will remove all history states saved previously, and you won't be able to undo your latest actions.
- Clicking All will purge all your Photoshop cache files.
- Video Cache stores changes you've previously made to the video project. You won't be able to restore changes after you purge video cache.
To clear Photoshop cache and possibly fix the scratch disks problem, choose the specific item you want to delete or select "All" to delete all of your cache files. If an item is greyed out, that means it has already been deleted.

You will be warned that the purge cannot be undone, so make sure you don't need a previous version of one of your projects and then click OK.
2. Delete your temp files
When it comes to your scratch disk space waste, Photoshop's own temp files are often the worst culprit. So, why store temporary files? Deleting these files may help you forget about the scratch disk full error message. Note that you may need to do it if you can't delete Photoshop's cache files, which is a rare occasion.
Before deleting temporary files, make sure to save your progress and close Photoshop. Now, you're ready to move on.
To find temporary Photoshop files:
- Go to Finder and click Go from the menu bar.
- Here, choose Go to Folder.
- Type
/tmpin the field and press Return.
This will open a new folder window that contains Photoshop files and folders. Now, as you see the list, carefully go through all of the folders and delete files that eat up the space of Photoshop scratch disks. Make sure you select only temporary files — those with the .tmp extension.
Alternatively, you could also search "Photoshop Temp" with a space between the two words right in your Finder search. Following the same logic as described above, you can safely delete files and watch as your scratch disk space is reclaimed. Get rid of as many files as you can.
Now, launch Photoshop once again. Hopefully, the scratch disk full errors are gone; if not, keep on reading to learn more tips.
3. Clear your disk space
If you don't have another drive or don't want to buy one, then it's time to do some spring cleaning. Look at the drive contents to see if you can delete anything you don't need to reclaim some disk space. Is there storage space that can be cleared? Usually, there is, so go ahead and delete your old files and free up some space.
Your Mac already has the built-in tools to help you manage storage space. If you navigate to Apple Menu > About This Mac > More Info > Storage Settings, you will see the storage graph.

Besides, you will see a list of recommendations. There are some truly helpful elements, such as using Optimize Storage to customize what TV shows and movies you store on your Mac and the option that allows you to view all your files, downloads, and unsupported apps. Explore the recommendations and tools to look for files you can remove to optimize your space and solve the problems with Photoshop scratch disks.
A good way to keep Photoshop cache from piling up is by running regular disk cleanups. It will help get rid of junk files that may be causing the scratch disk error. But here is a problem: the cache sits so deep in system folders and their subfolders that deleting it manually becomes a pain. A company called MacPaw produced a tool just for this purpose — CleanMyMac. You've heard of similar tools, but that one actually pioneered Mac cleanup.
Here's how you can schedule regular cleanings with CleanMyMac:
- Open CleanMyMac.
- Go to Cleanup and click Scan.
- Hit Clean to clean up junk files, or Review All Junk to select the items you'd like to remove.

Just let it do its thing. That way, you'll never forget to clear Photoshop cache files and tons of other system junk on your system.
Start your free CleanMyMac trial.
Advanced solutions
1. Change your scratch disk
So, you've identified rapidly depleting free space on your Mac hard drive as one of the factors behind the Photoshop scratch disk problem — now what? Well, it may be a good idea to change your scratch disk to another drive in your system. Just make sure it's not the system drive, as that is one drive you really don't want to slow down.
Here are some recommendations for choosing an optimal scratch disk location:
- Make sure that the scratch disk is not on the same drive on which you are editing large files.
- If possible, choose a disk other than the one on which Photoshop is installed.
- Do not choose a drive on which your macOS is installed as a location for the scratch disk.
- Ideally, if you don't have another drive, you could purchase one, with SSD being the best option for Photoshop scratch disk purposes.
Then, follow these steps to change your scratch disk using Photoshop preferences:
- Open Photoshop.
- Go to Photoshop > Preferences from the menu bar.
- Select Scratch Disks and tick the checkbox to select or remove a drive as the scratch disk.
- Click OK.
- Reopen Photoshop.
As mentioned, the scratch disk problem happens because of 2 simple reasons: lack of RAM and lack of free storage space. Both can be addressed if you buy a Thunderbolt SSD (solid-state drive) to use as your Photoshop scratch disk. We recommend investing in SSD, not HDD (hard disk drive), for several reasons:
- SSDs are more durable. Unlike HDDs, they do not have moving mechanical parts. So, if you drop an SSD, the risks of damaging internal parts are lower.
- SSDs consume less energy for the same reason. Also, because of it, they are less likely to overheat.
- SSDs run faster and are more reliable. They also have a shorter boot time, higher bandwidth, and rapid data transfer.
By today's standards, 256 GBs should be enough.
Once you've bought an external drive, you'll have to use Disk Utility to format it. Here's how:
- Connect your new drive to Mac.
- Go to Applications > Utilities and open Disk Utility.
- Choose your external drive in the sidebar and click Erase in the toolbar.
- In format, choose either APFS or MacOS Extended (Journaled) and click Erase.
- Now, follow the steps above to set it as a location for your scratch disk.

If it won't show as a scratch disk, check the connections and make sure you have enough read/write permissions.
2. Increase Photoshop RAM allowance
Photoshop uses not only scratch disk but also RAM when you work with large files and complex tasks. It is true that they are related to different types of tasks, but if you increase RAM allowance, it may reduce the strain on scratch disk.
Here's how to do it:
- Open Photoshop and go to Settings > Performance.
- Under Memory Usage, specify how much RAM Photoshop can use — either by entering a number or using the slider.

Extra tip: Consider quitting all unnecessary apps when working with Photoshop so they do not consume RAM.
3. Free up RAM in Terminal
When Photoshop gets paralyzed due to lack of RAM, there is a command you can run in Terminal.
- Open the Terminal app (find it in the Launchpad).
- Paste in:
sudo purge - Then, enter your password.
At first, you may not see the difference, but you've just flushed your RAM, releasing all the files kept in virtual memory. There are a few more ways to free up RAM; check them out, too.
4. Reset Photoshop preferences
Resetting Photoshop's preferences is one way to fix the "Scratch disks are full" error. Here's how to do that:
- Open Photoshop.
- Go to Photoshop preferences: from the menu bar, choose Preferences > General.
- In the window that appears, click "Reset Preferences On Quit."
- Click "OK" to confirm.
Now, you need to quit Photoshop to complete the reset. Quit the app or click Photoshop menu > Quit. Launch Photoshop once again and see if the scratch disk error message persists.
Long-term prevention strategies
1. Run regular maintenance
Did you know that instead of responding to Mac glitches you can take steps to prevent it from happening in the first place? One effective way to do it is to run regular maintenance. As related to the problem of scratch disks full, it means managing login items and background extensions that may consume too much memory and CPU as well as running different maintenance tasks that would speed up your Mac. It may also mean thinning Time Machine snapshots, which will also free up some extra space.
You can dig deep into System Settings and run Terminal commands to do it. Or you can let CleanMyMac and its smart Performance tool do the job for you. Here's how it works:
- Open CleanMyMac.
- Click Performance > Scan.
- Click Run tasks.
- Now, review login and background Items and check what to remove.
- If you have Time Machine enabled, you can also run Time Machine Snapshot Thinning.

2. Disable auto-recovery
It's great to automatically save recovery information — it helps you make sure no progress will be lost. But if you're experiencing the "scratch disks are full" error on a Mac, disabling auto-recovery might save you some gigabytes of space. So, here's how to turn off the auto-recovery in Photoshop:
- Go to Photoshop menu > Preferences.
- Select File Handling.
- Deselect the "Automatically Save Recovery Information" box.
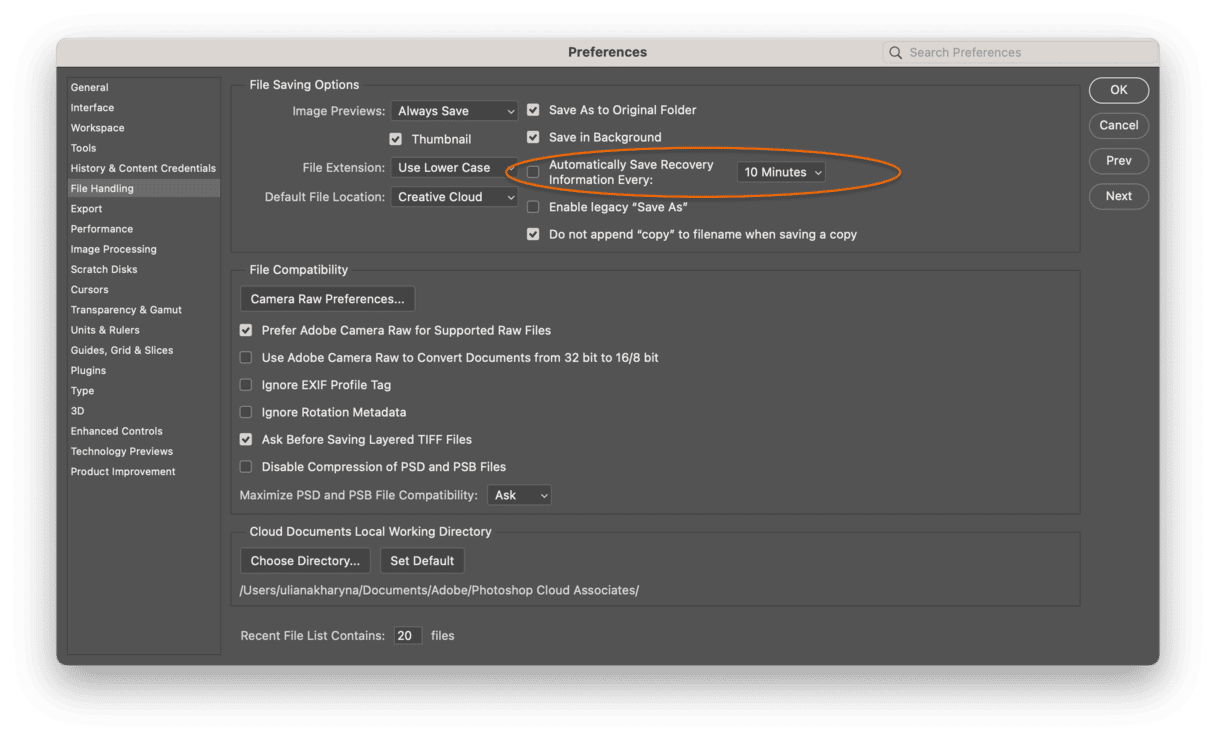
Now, all your progress won't be automatically saved, so don't forget to use Command-S occasionally.
3. Transfer files to external drive
If nothing so far has helped, it's time to seriously consider moving files to external drive. It is an easy way to respond to the lack of free space on Mac. You can buy an additional SSD or, instead, invest in a cloud storage solution.
Whatever you decide, the idea is to send the files you do not need or rarely open to an external drive so that they do not occupy the much-needed space. This way, you'll have access to them should you need such files in the future.
So, take some time to look through old photos and videos, as well as large and old files, and copy them to an external drive or cloud storage. Once done, don't forget to delete them from your Mac and empty the Trash.
What are scratch disks in Photoshop?
Scratch disk in Photoshop is your hard drive space used by the app as virtual memory when there is not enough RAM to complete a task. Photoshop allows you to assign several scratch disks. That way, it has more space for storing temporary files at its disposal.

When working with large images and lots of layers, Photoshop is secretly chewing up your drive space by rapidly creating a mountain of project temp and cache files.
It's important to note that when you set up Photoshop, you will have the option to assign the scratch disk to the drive of your choice. We highly recommend not using your system drive unless you have no other alternatives.
Why scratch disks are full?
Photoshop's temporary files are the most significant reason behind the "scratch disks are full" error. They usually mass up in your drive without leaving single evidence of their presence. If you have a habit of force-quitting Photoshop, you may have a lot of temporary files stored in your system. As Photoshop can't fully close all projects after you quit it so rapidly, it keeps such files on your computer.
Here are some other reasons that may cause the mentioned message:
| Lack of space | Little space left in the drive where Photoshop's scratch disk is located |
| Full disk partition | The partition of the disk being used by Photoshop is full |
| Limited RAM | Not enough memory allowed for Photoshop |
How to empty scratch disk without opening Photoshop?
You may be wondering how to fix scratch disk full in Photoshop without even opening it. Most commonly, it may be the case if you can't open Photoshop and use any of the solutions based on Photoshop Preferences. Luckily, there are a few workarounds you can try:
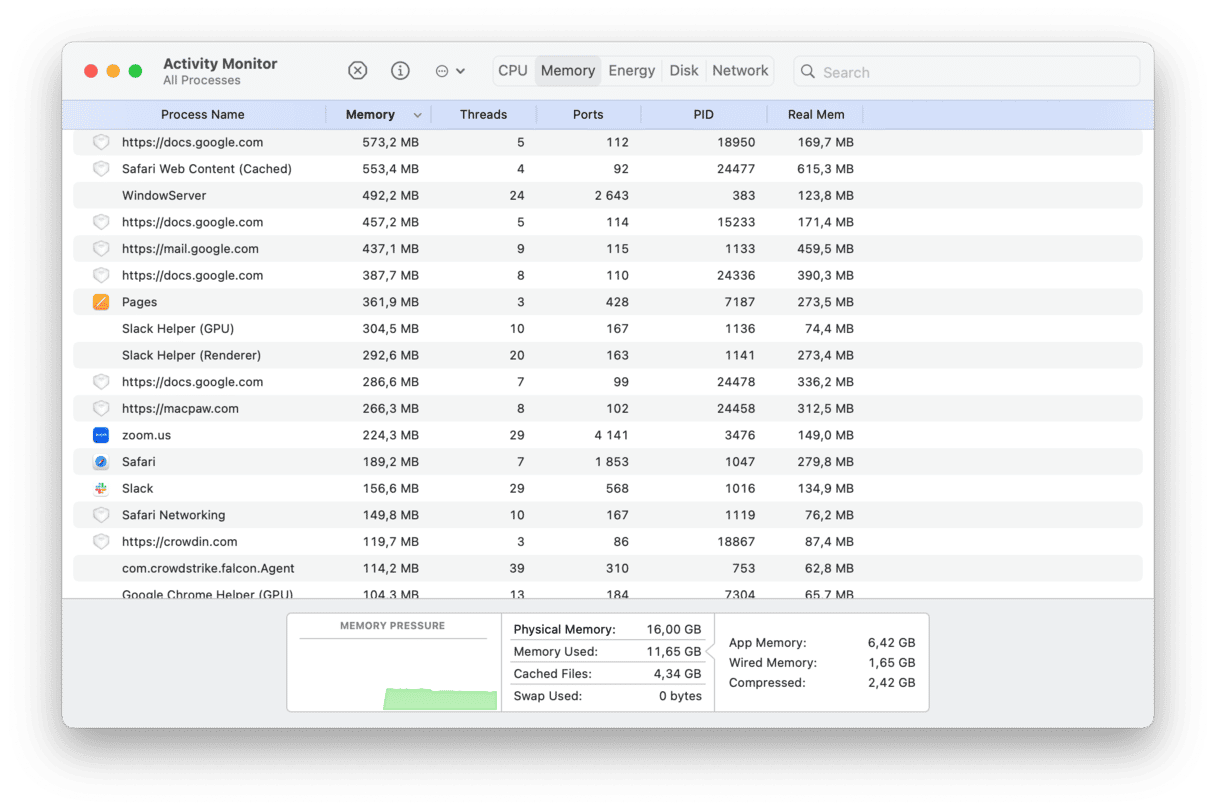
- Free up RAM using Terminal as described in step 7.
- Use Activity Monitor to quit memory-intensive apps. Open Activity Monitor, click Memory, and see what apps and processes use the most memory. You may also want to type 'Photoshop' in the search bar and quit anything related to it. Make sure to research what the names of the processes stand for to avoid quitting something vital for macOS.
The 'Scratch Disk Is Full' error is fixed!
If you followed this guide, there is absolutely no reason why you should ever have to deal with the annoying "scratch disk full" error again. Next time you want to create something amazing in Photoshop, you should experience something new — a Photoshop that runs so smoothly it practically purrs.
Whether you solve the problem yourself or let a great piece of software like CleanMyMac do it for you, just make sure you clean up your scratch disk. Your Mac will thank you for it*.
*Not literally. That would be weird.
Frequently asked questions
What are scratch disks in Photoshop?
Scratch disks are the space on the hard drive or SSD that is used for storing temporary files in Photoshop. These files are, for example, unsaved parts of the documents you worked on.
Is it possible to empty scratch disks in Photoshop?
The short answer is yes. It is done from the Edit menu (found in the menu bar with Photoshop open) and clearing out different types of caches by clicking Purge. This action is irreversible and temporary, though.
Is it safe to empty scratch disks in Photoshop?
It is generally safe. The only concern to consider is that temporary files will be lost, so make sure that all important changes have been saved.
How much free space should I have for Photoshop scratch disk?
There's no single answer. Generally, you should have at least 20 GB of space for basic Photoshop use, but if you constantly work with large projects, you need more — up to 200 GB. However, the more, the better.
How often should I clear my Photoshop scratch disk?
It's not a must-follow rule, but consider clearing it after every large project so that your Photoshop is always fast and ready for new tasks.
Why does my scratch disk fill up when opening large PSB files?
Like with any other file, it happens because your Mac lacks either free space or memory.