Macs with Apple silicon are more memory-efficient than Intel-based Macs, but it does not mean that you’d need less memory. In fact, if you had an Intel-based Mac with 16 GB of RAM, you’d unlikely be satisfied with 8 GB of unified memory on a Mac with Apple silicon. And over time, it may slow down, too. To give it a tuneup, free up some memory. So, how to clear RAM on Mac? Keep on reading, and you’ll learn what RAM is, how to check RAM consumption, and how to reduce RAM usage on MacBook in 12 easy ways. Let’s dive in!
What is RAM
RAM stands for random access memory. It is where everything that is currently being used is stored — apps, data, and components of the operating system. This space is short-term, meaning that it changes based on the apps you run. What matters is that you have enough RAM in order to open and utilize all of the apps you need.
How to check RAM usage on Mac
Go to Applications and type in Activity Monitor in the search bar. This invokes a good old Activity Monitor that should tell how much free memory you’ve got left.
A shortcut to open Activity Monitor: click Command-Space and start typing Activity Monitor in the search bar.
I’ve attached a screenshot from my Mac, and as you can see, my memory usage has almost reached full capacity. Here’s what it all means:

| App memory | taken by apps and processes |
| Wired memory | reserved by apps, can’t be freed up |
| Compressed | inactive, can be used by other apps |
| Swap Used | memory used by macOS |
| Cached Files | memory you can really use |
If the graph is green, it means that everything is OK and your Mac is not running low on memory. However, if your chart is red or yellow, your Mac is really gasping for fresh memory.
It seems counter-intuitive, but the amount of available memory on your Mac is not that important after all. In fact, it’s a system’s intended behavior to use all memory resources when available. On the contrary, the Memory Pressure graph is much more telling, so grow a habit of checking this graph in the Activity Monitor every now and then.
What consumes the most RAM
📌 Browsers and their extensions. Browsers tend to consume a lot of memory, especially if you keep many tabs open all the time. Browser extensions hog some more memory, so if you have many, they might take up too much of your RAM.
📌 Unclosed apps. When you have numerous apps open, all of them use up RAM. Some apps don’t quit when you just click the red X button: the window is minimized, and the app continues running and consuming precious memory.
📌 Apps that launch on startup. By default, some of your apps are set to start up with your Mac. Not only will they slow down the startup process, but they’ll also run in the background without you noticing and use up RAM.
How much RAM do I need?
There is no easy way to answer this question. However, here is a general recommendation: since you can upgrade RAM only in older Macs and cannot do it in newer models without purchasing a new computer, ask yourself what main tasks you are going to complete on it within three to five years before purchasing a Mac. If you will mainly work with texts or use your Mac for internet browsing, 8 GB of RAM should be enough. But if you plan to work with photo or video editors, play a lot of games, and use other resource-intensive apps, it is better to invest in a Mac with 16 GB of RAM. In fact, 32 GB would be even better in such cases.
How to check how much RAM you have
- Go to the Apple menu in the top left corner of your Mac.
- Click About This Mac > More Info > System Report.
- Now, choose Memory in the sidebar.

The number next to “Memory” is your available RAM.
How to free up RAM on Mac
Now that you know what consumes the most RAM, here’s how to check memory usage on Mac and, more importantly, how to fix it if MacBook is running low on memory.
1. Check CPU usage on Mac
Open the CPU tab in Activity Monitor to keep CPU-heavy processes in check. Usually, an app would use 0-4% of the CPU. If it takes abnormally more than that, go inside that particular item in the list and click the Quit button.

Note: Before quitting a process you do not recognize, google it — it may be something vital for the proper work of your apps or the macOS. One such process is kernel_task. It may eat up RAM, and that is why quitting it is too tempting. But because it is a fundamental part of the macOS operating system that manages system temperature and vital processes, quitting it can lead to instability or a system crash. So, it is better to quit apps, not such processes.
2. Free up RAM on Mac with CleanMyMac
Freeing up memory can be a one-click task if you choose a dedicated app to do it for you. CleanMyMac is an Apple-notarized Mac cleaner that helps declutter, optimize, and protect your Mac. It has a helpful Menu that can help prevent many issues on your Mac. Try it next time you see the “Your system has run out of application memory” message.
- Start your free CleanMyMac trial.
- Click the CleanMyMac icon in your menu bar.
- Click Free Up on the Memory panel.

When your Mac underperforms, open the CleanMyMac menu to check your memory usage. You can also quit apps that consume a lot of your memory: click the Memory panel and review the list of applications under Top Consumers.
While in the Menu App, check out the Protection tab. It scans your Mac for malware in real time. If you need a deeper investigation, open CleanMyMac and run the Protection scan. Why? Because malware can eat up RAM, too, so that if your Mac is almost always running low on memory, it may be caused by an infection you may have missed.
Although using CleanMyMac’s Menu App is the easiest way to free up RAM on Mac, there are other similar tools — here’s a review of best Mac memory cleaners for more information.
3. Remove Login Items
Login Items are programs that load automatically upon Mac startup. Some of them covertly add themselves to the list, which is no good. If you’re looking to free up RAM, they are the first candidates for deletion. Don’t worry, you’re not deleting the app itself; you just stop it from auto-launching every time.
So, to remove Login Items and at the same time reduce your memory usage of your Mac, you need to:
- Open System Settings > General > Login Items & Extensions.
- Look for Open at Login.
- Click programs you don’t want to load as your Mac starts.
- Click the “–” sign below.

Now, you won’t see these apps pop up the moment you turn on your Mac.
4. Restart your Mac more often to free up RAM
Restarting your Mac is basically the simplest way to deal with numerous issues at once, and freeing up memory is just one of them. Basically, it empties RAM and clears out all temporary files. It is a good practice to develop a habit of restarting your Mac every few days.

5. Free up disk space
The available space on your Mac’s does not directly affect RAM. However, if you do not have enough free space, and your MacBook is running out of RAM, it will become painfully slow and apps may start crashing unexpectedly.
So, freeing up some space comes to save you when you’ve run out of physical RAM because now your computer relies on your drive space to keep your apps going.
The classic geek rule of thumb holds that you should keep at least 20% of disk space on your startup drive. Not only does this potentially reduce your future spending on iCloud storage, but it also keeps your Mac speedier.
What to delete to free up space:
- Large unused files, like movies
- Old downloads
- Rarely used applications
- System junk
To see how much free space you have available, go to the Apple menu > System Settings > General. Here, click Storage.

Your Mac has a few built-in tools for managing disk space. Look under the Storage bar to access them and delete unneeded things here and there. For more tips, check out this article on how to free up space on Mac.
6. Clean up your Desktop
This tip always comes at the bottom of instructions and unfairly, so it is pretty effective. Without even looking at your Desktop, we would assume it’s cluttered with mountains of icons. The thing is, your macOS was designed in a way that it treats every Desktop icon as a little active window. The more icons, the heavier memory usage on Mac. So, in order to release available memory resources, it’s recommended to keep your Desktop clean.
To clean up the mess, Control-click your Desktop and select Use Stacks. This feature organizes your files and makes it easy to delete things in bulk.

7. Clear cache files
Another way to free up RAM on Mac is to clear it of cache files. Of course, it won’t save you gigabytes of space, but by deleting cache regularly, you can help your Mac run faster and avoid system issues.
So, to remove cache files on your Mac, you need to:
- Open Finder.
- From the Go menu, select Go to Folder.
- Type
~/Library/Cachesin the field and press Return.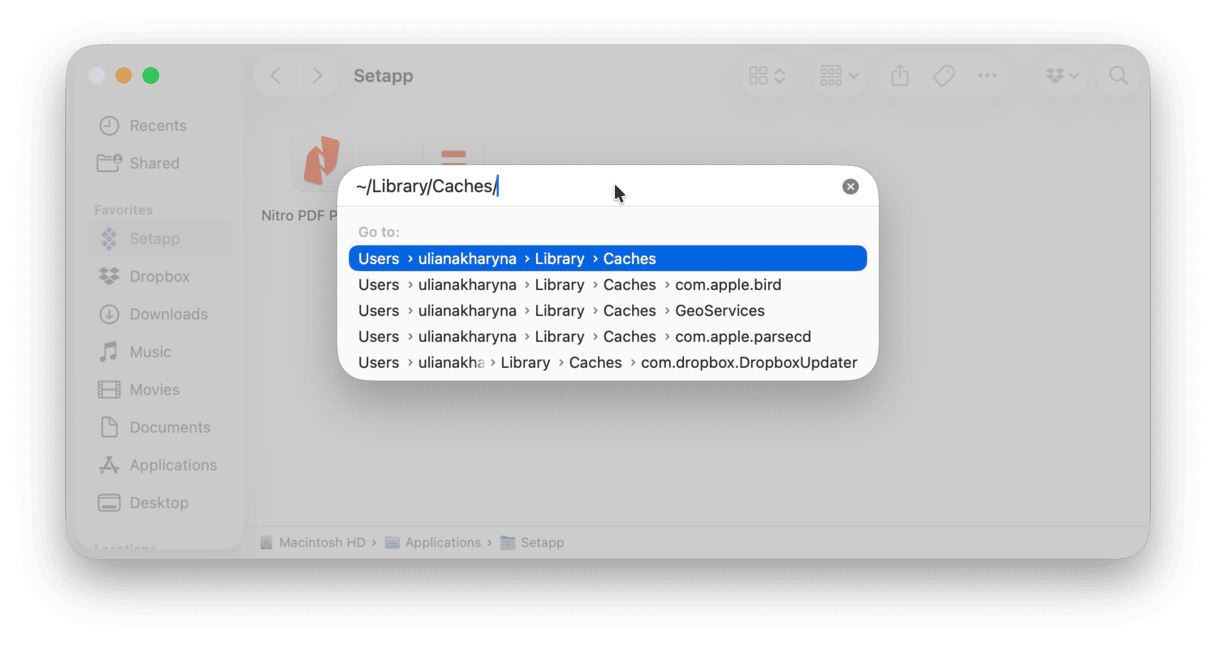
- In the window that appears, you will see all your cache files.
- Press Command-A to select all files or delete files one by one.
- Enter your username and password to confirm.

If you find some files still in the folder after you emptied it, maybe you have some windows open on your Mac. Just like that, you can save up some space on your Mac. Don’t forget to empty Trash afterward.
8. Run maintenance tasks
CleanMyMac has another convenient feature that helps give your Mac a little speed boost. By using the Performance tool, you can run maintenance tasks like flushing DNS cache, repairing disk permissions, or speeding up Mail to make your MacBook work flawlessly.
Here’s how it works:
- Open CleanMyMac and go to Performance.
- Run a scan.
- Click Run Tasks, and CleanMyMac will perform recommended routines. Alternatively, click View All Tasks and choose what to run.

That’s it! If you haven’t removed login items and background extensions in step 3, you can use the same Performance tool to do it.
There are a few more tricks that will help you fix your RAM issues. Read on.
9. Update your Mac
Sometimes, RAM usage may increase because your system is not optimized well. One of the ways to do it is to update your Mac to the latest macOS version it is compatible with — every new macOS comes with improvements and enhancements that may keep your Mac in a better shape.
Here’s a quick reminder about how to update your Mac:
- Go to System Settings > General > Software Update.
- Click Update Now or Restart Now and follow the on-screen instructions to install any update that is available.
- While waiting for the update to download, enable automatic updates.

10. Tune up Chrome’s Task Manager
Although Google Chrome is not the one to blame for massive memory usage, it can indeed affect your Mac’s performance. If you use Chrome as your primary browser, you probably have many windows open there. Chrome runs a lot of processes to ensure a fast browsing experience for you. So, it uses your RAM for storing your tabs, plug-ins, and extensions. Look at how many entries Google Chrome has in Activity Monitor:

The question then arises, “Why does Chrome use so much RAM?” The thing is that each process is responsible for a separate plug-in or extension of your browser. For example, when a tab unexpectedly falls, you need to refresh it to continue your work there. If one process were responsible for all tabs and extensions, you would need to restart the whole browser instead. Can you imagine how many times you would do that? That’s the proper answer to why Chrome uses so much RAM.
I’ve been using Chrome for some years, only to discover (recently) that Chrome had a task manager of its own. You can use it to force quit memory-heavy processes in the browser. It’s a handy tool because it lets you see how a page weighs on CPU usage on a Mac.
- Go to Chrome menu (dotted icon in the top right corner).
- Click More tools > Task Manager.

To free up even more RAM, close the GPU process. The GPU Process, though helpful in theory to accelerate pages, eats up a considerable amount of memory. Click End Process next to it to free up RAM on your Mac.
11. Close Finder windows
Okay, suppose you’re still asking yourself, “how I clear RAM on my MacBook Pro/MacBook Air?” The next trick is as magical (you’ll see for yourself) as it is time-saving. It’s no secret that each window in the Finder eats up RAM. But how many open windows are there? Some of them are collapsed or stacked in some blind spot on your screen. This Finder command merges all your windows into one. See how to do it:
Click on Finder > Window > Merge All Windows.

Now you can manage Finder windows more effectively and free up memory on MacBook.
12. Keep fewer opened tabs in the browser
Regardless of the browser you use, it may be a real memory hogger. Most commonly, it is Chrome that is blamed for significant RAM usage, and Safari is more memory-efficient, especially on Apple devices. However, the truth is that any browser can eat up memory, especially if you have dozens of tabs opened at the same time. Therefore, another tip is to keep fewer tabs in the browser. You can either close the unnecessary ones or save them to the reading list or bookmarks if you need to access them later.
Another way to have fewer browser tabs open is to create tab groups. Steps for adding tabs to groups differ for different browsers.
Safari:
- Click the down arrow next to the sidebar icon top left and choose New Empty Tab Group.
- Name it.
- Right-click a tab, choose Move to Tab Group, and choose the needed option.
- You can also control-click tabs and send several tabs to a tab group at once.

To access the needed tab group, click the sidebar icon and choose your option under Tab Groups.
Chrome:
- Right-click a tab.
- Choose Add Tab to New Group.
- Name the tab group.

For other tabs, click Add Tab to Group and either create a new one or add to the existing groups.
Tab groups come with colored badges with names on them. Click one, and all tabs will open.
Firefox:
Creating a tab group in Firefox is similar to Chrome:
- Right-click a tab and choose Add Tab to New Tab Group.
- Fill out the details and click Done.
- For other tabs, right-click them and choose Add Tab to Groups.
- From there, choose either your old group or create a new one.

There you have it. This was our take on how to decrease RAM usage on Mac. If you have followed all steps closely, your MacBook should be faster by now. Thank you for reading, and come back later for more tips and tricks.
Frequently asked questions
Why does macOS use all available RAM?
macOS appears to use all available RAM, and it is considered a normal behavior because macOS caches a lot of stuff to improve its performance. It automatically and dynamically reallocates RAM when another app opens or the system needs it for some other processes. As long as the memory pressure is within the green range, it is not a problem.
How is RAM different from virtual memory?
RAM is physical memory. Virtual memory, on the other hand, is a software-based technique that uses a portion of a slower storage (Mac’s drive) to extend RAM
Is 8 GB on M3 really equal to 16 GB on other systems?
No. However, unified memory architecture and efficient memory management make it perform better than a traditional 8 GB setup, but not always as good as 16 GB on other systems.
Should I boot into safe mode to reduce RAM usage?
There is no need to do it. Although it can fix minor glitches, it is better to deal with the root cause of the problem (e.g., too many tabs, unneeded login items, or cluttered desktop). However, if you want to test it, check out the guide from Apple on how to boot into safe mode.
What is inactive RAM and how does it work?
Inactive RAM is a portion of memory that was recently used by a process or an app. It is stored in cache so that it can be quickly reallocated if the app/process is relaunched or another app/process needs it.
Could a stuck print job be causing my Mac to hang?
Yes, especially if it starts using too much CPU or memory. To fix it, check the print queue in System Settings > Printers & Scanners and quit a stuck job if needed.
Should I run an Apple Hardware Test if RAM usage is high?
Not immediately. RAM usage is mainly a software problem, not a hardware issue. Because Apple Hardware Test, aka Apple Diagnostics, detects physical hardware malfunctions, it can be of little value for RAM management.